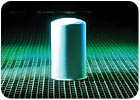
An oil filter being UV cured.
In the past, ultraviolet (UV) curing of coatings on three-dimensional parts has presented a challenge to both formulators and end users. The same can be said of pigmented opaque coatings at higher film builds. When metal substrates are thrown into the mix, another degree of complexity is encountered. How can these challenges be overcome?
Formulation and application go hand in hand. The end requirements of the coating - adhesion, gloss, opacity and weathering - are crucial in determining which raw materials can be used successfully. The application method will also influence raw material selection. For example, spray applied coatings will not use the same raw materials as a roll coated coating simply due to the differences in the viscosity needed to apply each. With so many possibilities, where does a formulator start? Start at the end and work your way back. This article focuses on a coating that is opaque white, spray applied at 100 percent nonvolatile materials (NVM), capable of adhering to stainless steel, high gloss (>85 at 60°) and minimal weathering (six to nine months).
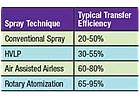
Some typical transfer efficiencies for each spray method. Actual transfer efficiencies will vary depending on part style, spray setup, painting style and other factors.
Application Method
Many ways exist to apply a UV curable coating to a substrate, including spray, roll, dip, flow, gravure and vacuum coat. The part geometry, amount of production floor space, and the coating's solids content are just a few parameters that will influence the application method. Since the coating of interest will be spray applied, the other application methods will not be addressed.Viscosity and rheology are key factors in successfully spraying a coating. A coating must have a low enough viscosity so that it can be properly atomized before hitting the substrate, but it must also have a rheology that allows it to recover quickly and not run down the part or sag. This balance can be achieved either in the formulation or by manipulating the coating through physical means during the application process. The quickest way to lower the viscosity of a coating is to cut it with an organic solvent. However, if solvent is used, a separate processing step must be added to ensure its removal prior to the UV cure. This step will take up production floor space and require additional capital investment, as well as decrease throughput by increasing the overall process time. The coating under discussion does not contain solvents, so other methods will be used to ensure that it is at the proper spray viscosity.
A highly viscous coating can be modified for spraying simply by heating the coating prior to application. Heat is an efficient way to lower viscosity; however, it must be applied uniformly and not excessively to retain the integrity of the coating. Each formulation will vary, but in general, UV-curable coatings should not be heated above 120 to 140°F (49 to 60°C) for extended amounts of time. There is no absolute viscosity that will give the best performance; the optimum performance will vary depending on the thixotropy of the coating, part geometry and other processing variables. However, the viscosity can influence which spray method to use. Conventional spray guns, high-volume low-pressure (HVLP) guns, air assisted airless guns and rotary atomizing units can all be used successfully, but some formulations are better suited for specific application types.
Conventional Spray Guns
Conventional spray guns are the simplest to use and have been around the longest. Simply stated, the coating is drawn through the gun nozzle. Compressed air is introduced and surrounds the coating, breaking it into fine droplets. These droplets are then propelled toward the substrate. Once they hit the substrate, they will flow together and create a smooth, continuous coating layer. Lower-viscosity coatings (22 seconds Zahn 1 up to 25 seconds Zahn 2) should work well with conventional spray guns.
HVLP Guns
HVLP guns are similar to conventional spray guns with the exception that they operate with a lower atomization pressure. The lower pressure provides a higher transfer efficiency over conventional spray guns due to the decreased amount of overspray, and will also greatly reduce the coating "cloud" seen with conventional guns. In some cases, orange peel can increase with HVLP guns compared to a conventional spray gun. The viscosity range of conventional guns applies here as well.

Focused vs. unfocused reflectors.
Air assisted airless guns can allow for better atomization compared to both conventional and HVLP guns. Atomization air pressures are lower, but fluid pressures are higher (200 to 1200 psi). The transfer efficiency is also higher with the air assisted airless, which will allow the coating to build faster on the part over conventional and HVLP guns. If higher film builds are required, air assisted airless guns may be a better choice. A coating with a 28-second viscosity Zahn 3 sprays well with this setup.
Rotary Atomization
Rotary atomizing units operate on a different principle: Instead of using air to atomize the coating, the units use centrifugal force. The faster the rotational speed, the finer the atomization. The rotary atomization can break the coating into finer particles, which allows for a smoother laydown at lower film builds. Rotary atomization also works well for high-viscosity coatings. Coatings with a viscosity as high as 45 seconds on a Zahn 3 have been sprayed successfully in a commercial environment using a rotary atomizer.
Electrostatics
With metal parts, electrostatic spraying is a natural option. Adding electrostatics to the spray application will increase transfer efficiency. However, depending on the geometry of the part, electrostatics might present more problems. If the parts have deep recessed areas, the charged coating particles will not transfer to the recessed areas, but will accumulate on the side walls instead due to Faraday cages This accumulation will lead to uneven film builds on the part and potential runs in the thickest areas.
Table 1 lists some typical transfer efficiencies for each spray method. These are guidelines and should not be considered absolute values. Actual transfer efficiencies will vary depending on part style, spray setup, painting style and other factors.
The coating discussed in this article can be sprayed using any of these techniques. The viscosity is low enough to be sprayed with conventional or HVLP guns; however, the dry film thickness (DFT) will be around 2.2 to 2.6 mils to get a smooth, continuous film. If either air assisted airless or rotary atomization is used, this minimum wetting film build range can be lowered to 1.6 to 2.0 mils. After the coating has been applied to the substrate, it will remain in liquid form until it has been exposed to UV energy. This stage of the process is called curing.

Standard mercury vapor UV spectrum.
Curing
UV curing is a line of sight process - if the coating does not receive UV energy, it will not cure. To successfully cure 3-D parts, the UV lamps must be placed to allow the energy to irradiate the coating. In some cases, the lamp placement must be quite creative to ensure that no shadowed areas are left under-exposed.Keep in mind that the lamp-to-part distance can make a vast difference in curing efficiency; the further the part is from the bulbs, the more the UV intensity will drop off. Lamps can be run in focus or out of focus (see Figure 1, p. 24). If the lamp-to-part distance is greater than the focal point of the lamp, it is better to run the lamps out of focus to ensure optimum UV intensity at the coating surface. Proper radiometry should be run to ensure that the optimum UV energy is reached.
The two main types of lamps used to cure UV coatings are arc and microwave. These terms refer to the way in which the bulbs are powered. An arc system relies on an electric current to excite the gas molecules inside the bulb. A microwave bulb is powered by microwave energy exciting the gas molecules. The microwave systems are considered "instant on," whereas an arc system will need a few minutes initially to reach the optimum operating conditions. Other differences between the two technologies are the bulb size, bulb life and amount of heat produced. However, once the systems are operating, there is little difference in the UV energy each emits.
UV spectrum of an iron-doped bulb.
The bulbs in microwave systems are generally 6 inches long but can go up to 10 inches, while arc lamps can use longer bulbs. If larger parts need to be cured with microwave systems, multiple bulbs can be staggered to create the same curing area found in an arc lamp system.
Heat Production
In general, arc lamps will produce more infrared (IR) energy than a microwave system, but air- or water-cooled jackets can be used to dissipate the heat emitted from an arc system. If the parts being run are heat-sensitive, microwave systems may be a better choice. However, heat is not a major concern with metal substrates except when parts must be handled immediately after cure or when parts contain a flammable material.
Bulb Life
An arc bulb will typically need to be replaced after 1500 to 3000 hours. Keep in mind that these bulbs will burn out from the ends to the center. Microwave bulbs have a longer life and generally do not need to be replaced until around 8000 hours. Both systems require regular maintenance (reflector and bulb cleaning and rotation) to ensure the proper UV output.
UV spectrum of a gallium-doped bulb.
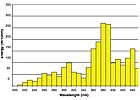
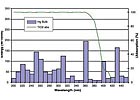
The UV spectrum is divided into four regions: UVA (320 to 390 nm), UVB (280 to 320 nm), UVC (250 to 280 nm) and UVV (395 to 445 nm). For most clear UV-curable coatings, UVA and UVB are the crucial regions of energy. Regular mercury vapor bulbs will cover these regions adequately and will work well with most UV-curable coatings (see Figure 2). However, coatings with added pigments or increased film builds might require doped bulbs, which contain another metal (usually iron or gallium) in addition to the mercury in the bulb. The presence of these metals reduces the life of the bulb by 15 to 20 percent but shifts the UV energy spectrum to provide increased curing intensity (see Figures 3 and 4). An iron-doped bulb will give a broader intensity in the UVA region, while a gallium-doped bulb will provide greater intensity in the UVV region. Both microwave and arc lamps can use doped bulbs
For white coatings thicker than 2 mils, a gallium-doped bulb followed by a regular mercury bulb can give an optimum depth of cure with a balance of good surface cure. Black and darker blue coatings might benefit from an iron-doped bulb combination. Since the doped bulb provides depth of cure, it should be used before the mercury bulb. Formulations with different photoinitiators and pigments might require different lamp arrangements.
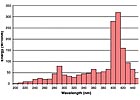
UV spectrum of a mercury bulb with titanium dioxide absorption.
Formulation
Once the ground rules have been set for processing, formulation can begin. Based on the requirements of the sample coating under discussion - high gloss, 100 percent NVM and limited weathering - several raw material choices will be eliminated.Oligomers
The first choices to make in formulating are the oligomers. UV-curable coatings can cure by either a free radical or cationic mechanism. Many metal coatings use the cationic mechanism due to the lower shrinkage encountered, which generally provides better adhesion to metals. Since cationic-cured coatings do not have great weathering characteristics, we will focus on a free radical formulation.
Free radical formulations are based on acrylate chemistry. The oligomers can be urethane acrylates, epoxy acrylates, polyester acrylates or acrylic acrylates. Each group has positive attributes: Urethanes weather well, epoxies cure quickly, polyesters wet pigments well, and acrylics improve adhesion. Based on these general descriptions, any of these families could be used to formulate a coating for metal applications. Extensive screening must be done to find the best oligomers for the application. In most formulations, a blend of chemistries can optimize the performance characteristics.
UV spectrum of a gallium-doped bulb with titanium dioxide absorption.
Once basic adhesion is obtained, the rest of the properties must be addressed. Since no solvent can be used to lower the spray viscosity of this coating, reactive diluents are necessary. Reactive diluents can best be described as lower molecular weight oligomers. It is due to this lower molecular weight that some reactive diluents can cause skin irritations. Not all reactive diluents are considered irritating, but individuals will react differently to each diluent, much like a bee sting allergy. Proper handling procedures should be followed at all times.
Additives
To enhance adhesion to metals, acidic adhesion promoters can be used. Although adhesion can be improved with these additives, care must be taken to ensure that they are compatible with the rest of the formulation.
Flow additives are used to improve the leveling and appearance of the coating. These additives lower the surface energy of the cured coating so that if another coating is applied directly over the first layer, the liquid coating will reticulate and not form a uniform coat.
Pigments
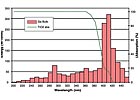
Pigments must be added to obtain the coloring, but pigmented coatings add another degree of difficulty in curing UV coatings. Unlike thermal cured systems, pigments can interfere with the curing process. This effect becomes obvious when the UV energy output of the bulb is compared to the absorbance of a white pigment (see Figure 5). Below 400 nm, the absorption of titanium dioxide is so strong that it can interfere with most of the energy output of the mercury bulb. A simple fix to this problem is to switch to a doped bulb (see Figure 6). With a gallium-doped bulb emitting more energy in the longer wavelengths (greater than 400 nm), less interference with the pigment occurs.
Black coatings are difficult to cure because they absorb UV and IR energy. The absorption of IR in the form of heat can be a problem with heat-sensitive substrates; the absorption of UV energy is a problem with cure. The pigment will compete with the photoinitiator for the UV energy, which can lead to slower line speeds to obtain adequate cure. With slower line speeds, the substrate will absorb more heat.
Although yellows do not absorb UV energy, they are difficult to cure because they filter the UV energy. This filtering causes the photoinitiators to be less efficient, leading to slower line speeds.
The large amount of titanium dioxide required for opacity presents difficulty in curing white coatings. Pigment amounts will vary depending on the desired DFT of the coating and the amount of opacity needed. For applications that require low film builds (10 to 20 microns), it is not uncommon for a formula to contain up to 45 percent titanium dioxide. Less pigment is needed for higher film builds.
Although these colors are more difficult to cure, they are not impossible. With the proper bulb and photoinitiator selection, all colors can be successfully cured in a UV system.
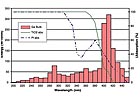
UV spectrum of a gallium-doped bulb with titanium dioxide and photoinitiator absorption.
After the oligomer selection, perhaps the most crucial formulating choice is the photoinitiator (PI). It is this component that makes the UV curing possible. Photoinitiators can be for either surface cure or through cure. Those that absorb energy at the longer wavelengths (>340 nm) are better suited for the through cure of pigmented coatings because there is less interference with the pigment and the photoinitiator (see Figure 7).
For white formulations, the photoinitiator must absorb in the longer wavelengths without causing yellowing. Efficient photoinitiators are available, but they must only be used in darker colors due to the negative effect they can have on the color of a white coating.
It is always important to balance the through cure with the surface cure. As stated earlier, UV coatings cure by line of sight. This means that they will cure from the surface of the coating down to the substrate interface. Usually, a photoinitiator package (two or more PIs) is used that will cure both at the surface and at the substrate interface. If the surface cures too quickly, it will inhibit the amount of UV energy that is allowed to penetrate to the substrate, causing a wrinkled or "pinched" appearance. In severe cases, the surface may be completely tack-free, but the coating underneath will not have had a chance to cure and will remain wet. This effect is more common as film builds increase to the 4 mil or greater range.
The proper bulb selection can facilitate processing. If a gallium-doped bulb, which emits in the longer wavelength region, is used first, the UV energy will be allowed to penetrate deeper into the coating. If the gallium-doped bulb is then followed up with a standard mercury bulb, the shorter wavelength UV energy can finish the curing at the surface. This is a prime example of the formulation and application working together to optimize the cure process.
Conversely, if an insufficient amount of surface cure photoinitiators is used, the surface of the coating will be tacky (or even wet) and the gloss will be lower, but the substrate interface will be cured. Going back to bulb selection, as the film builds increase, it becomes more important to use two types of bulbs. The thicker the coating, the deeper the UV energy has to penetrate to cure all the way to the substrate. A white coating at greater than 3 mils will have a difficult time curing tack-free at the surface with only a gallium-doped bulb.
Table 2 shows some comparisons between bulb combinations and film builds, and the effects on cure and appearance on a white coating. The UV energy was measured with a Power Puck radiometer. Although all of the bulb combinations gave adequate cure responses at a DFT of 2 mils, the appearance of those cured with only a standard mercury bulb or an iron-doped bulb was not acceptable.
The bigger differences arose when the coating was sprayed at 5 mils DFT. Based on the cure response and appearance, the gallium-doped bulb followed with a standard mercury bulb was the only combination that gave acceptable results. The gallium-doped bulb could not provide an adequate surface cure by itself, and the other bulb combinations could not cure the coating all the way to the substrate.
The ability to cure at a variety of film builds is crucial when coating 3-D parts. Spraying recessed or shadowed areas can present difficulties in maintaining a consistent film build over the entire part. The coating will build more quickly on flat, open areas than in these problem sections.
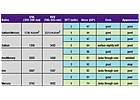
The effects of bulb selection on the cure of a white coating.
Report Abusive Comment