How Wood Characteristics Affect Finishing
Wood is finished to protect it from weather, wear, dirt and other common hazards. Wood is also finished to enhance its natural beauty or, in some cases, to make a less expensive wood look like a more costly one. Regardless, anyone involved in wood finishing knows that this material varies substantially from species to species and sometimes within the same species. If this variation is not understood and accounted for, producing a quality product will be difficult.
There are two broad categories of variation. First, wood is a natural, biological material and thus its properties are expected to vary. Some important properties include the presence of extractives, grain orientation, porosity, dimensional change and color. Second, the process and care that is used in manufacturing wood from standing trees to create a product ready to be finished can also result in substantial variation. Some examples include the method and care used to cut boards and veneer from a log, drying, gluing techniques and sanding.

Biological Properties
Woods are divided into two broad categories: softwoods and hardwoods. Softwoods include the pines, spruces, firs, cedars, redwood and cypress; hardwoods include oaks, walnut, cherry, maples, ash, gum, cottonwood, willow and several others. The separation has nothing to do with weight or hardness because some softwoods, such as Douglas-fir and southern yellow pine, are heavier than some hardwoods, such as cottonwood and willow.Softwoods are typically used for construction purposes and, in the case of siding and millwork, are often painted or sometimes stained. Many of the hardwoods are used for interior decorative applications, and a finish is used to enhance their natural beauty.
Pines, particularly, can contain large amounts of resin. This resin should be set by the use of high temperatures in the kiln drying process. If not, it can bleed through the surface, resulting in a discoloration or actual accumulation of resin on the surface (Figure 1).

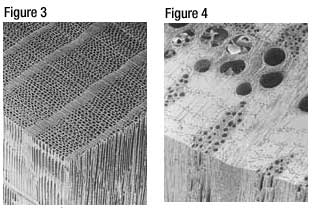
Figure 3 shows a scanning electron micrograph of southern yellow pine. A cross section of the end grain of the wood is shown at the top with a radial section to the left and a tangential section to the right. The cross section shows the growth rings. The rings begin with large, open cells called tracheads. These tracheads are about 35-45µm in diameter.
The growth rings end with a band of thick-walled, dense cells. These thick-walled cells will not accept and hold paint as well as the larger cells. The thick-walled cells are called "latewood," or "summerwood," and the thin-walled cells are called "earlywood," or "springwood." Some softwoods, such as white pines, cedars and cypress, do not have a latewood band and tend to hold paint much better.
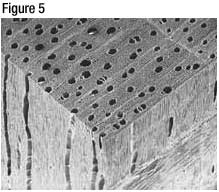
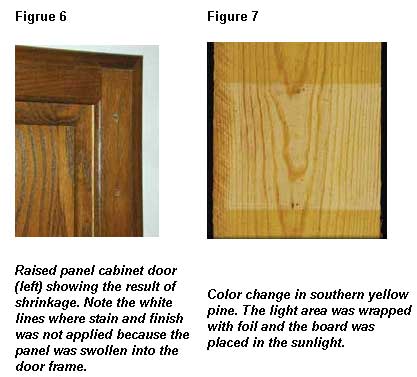
Figures 4 and 5 show electron micrographs similar to Figure 3, but of two drastically different hardwoods. Figure 4 is white oak. The large openings are vessels, or pores, and range in diameter from 150 to over 300µm in diameter. These large pores are formed early in the growing season and then end abruptly as much smaller, mostly thick-walled cells are formed. The wood is said to be "ring porous."
Figure 5 is a sugar, or hard, maple. These pores range from 50 to100µm in diameter and are uniform in size across the entire growth ring. The wood is called "diffuse porous." These two woods represent a wide range in cell size and arrangement in the hardwoods.
Oak is distinctly different from hard maple. The large pores in oak can be filled to form a very smooth finish or left open for a more natural look. The large pores will also accept stain easily. The pores in hard maple are so small that the wood does not stain easily. During sanding, the wood is easily burnished, making it difficult to finish.
The way in which a board is cut from a log can have a very significant effect on how it appears and its properties. Most lumber and fine face veneer is cut or sliced tangent to the log surface. On ring-porous hardwoods and softwoods with a latewood band, a very characteristic "U"- or "V"-shaped pattern results.
Some lumber and veneer is purposely cut on the radius from the pith to the bark. This wood is said to be "quartered" or "edge-grained." Quartered oak shows broad wood rays. "Rift cut" refers to a pattern that results when the rays are cut at a 45-degree angle.
In reality, wood is usually a combination of the above "idealized" cuts. Veneer can be sliced in any of the three patterns above, as well as rotary cut.
The natural tendency of wood to change dimensions as relative humidity and temperature change is probably the largest single cause of problems in manufacturing and use of the product. Wood intended for outdoor, but protected, applications, such as trim and siding, should be conditioned to about 12% moisture content. When used indoors, wood is conditioned to 6 to 8% moisture content for most areas of the U.S. Wood should be conditioned to somewhat higher moisture contents for damp coastal areas and to lower moisture contents for dry regions.
These are average conditions and the wood will still shrink and swell some as the relative humidity changes, but generally not enough to create any problems. As an example, a 6-inch-wide, red oak board at 70°F and 35% relative humidity will shrink 3/64 of an inch if the relative humidity is lowered to 20%. If the relative humidity is increased from 35% to 65%, the 6-inch-wide board will swell 5/64 of an inch.
These humidity changes are not atypical from winter to summer in much of the U.S. However, increasing the humidity to 90% will result in an excessive 1/4-inch width increase. These changes take time, but they are inevitable, particularly if wood products are stored in uncontrolled environments. Any finish must be capable of accommodating the possible expansion or contraction of the wood product. Large panels, such as desks and tabletops, composed of veneer glued to MDF or particleboard will not expand or contract as much as solid wood.
Color in wood varies greatly and it can change in response to light. In freshly machined wood, the sapwood or the lighter outer portion of a tree stem tends to turn yellow or brown while dark-colored woods can bleach noticeably (Table 1)Figure 7. shows the effect of sunlight on southern yellow pine. The light-colored central portion of the board was protected from sunlight by aluminum foil while the top and bottom portions were fully exposed to sunlight.
Manufacturing characteristics
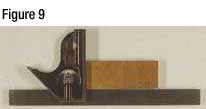
Lumber is kiln-dried to quickly obtain the moisture contents suggested earlier. Difficult-to-dry hardwoods, such as oak, are often air-dried first. Many problems can occur in the drying process, which will result in a defective product. The problems are often not found until later in the manufacturing process. Lumber with a moisture content that is too high or too low for the intended use is one problem. After installation, the wood changes dimensions and joints open up, or warping occurs. Open joints often expose unfinished wood, so they are particularly noticeable. Many times, only one or a few pieces of lumber that did not dry properly are creating the problem rather than the entire kiln charge. In this case, it is particularly hard to identify and solve the problem. Figure 9 Another problem, particularly with oak, is deep surface checks on thicker lumber. These checks occur as the surface of the board dries and shrinks while the core is still fully swollen. Once the core begins to dry, it can pull the checks back together so that they are not easily noticed. However, once a stain is applied, the checks can reappear and cannot be repaired.Figure 9 shows a drying problem called "planking." The two original staves of wood were probably at the same, but somewhat elevated, moisture content when they were machined and glued together. The piece on the right shrunk in the tangential direction (thickness) while the one on the left shrunk in the radial direction.
Sunken glue joints are another moisture-related problem. In this case, the problem results from the moisture that is present in the adhesive, not the moisture content of the wood. At a freshly glued joint, the wood actually swells, due to absorption of the water in the adhesive. If the wood is now surfaced, more wood is removed in the swollen area than from the rest of the panel. Later, the moisture near the joint migrates out of the wood or to adjoining wood, and shrinkage occurs in the immediate area of the joint. Freshly glued panels should be allowed to set until the moisture near the joint has had enough time to move out of the wood or to redistribute itself.
Veneer and subsequent finish checking are also common problems. When veneer is flat-sliced or rotary-peeled, checks occur. The depth of these checks can vary tremendously, depending on many manufacturing variables. Face veneer can be laid with the checks turned up (loose side out), turned down (tight side out) or, in the case of book-matched veneers, for example, the sheets of veneers are alternated so that one has the tight side out and the next has the loose side out.

Sanding is a crucial part of the wood finishing process. In most cases, the objective is to remove any knife marks from machining and help prepare a smooth surface to enhance the natural beauty of the wood. The first sanding pass is usually with a fairly coarse abrasive, such as 80-grit. Each subsequent pass is with a finer grit, which should remove any scratch marks left by the previous pass.

References:
Wood Handbook, Wood As An Engineering Material - Forest Products Laboratory General Technical Report FPL-GTR-113. www.fpl.fs.fed.usKollman, Franz F.P. and Wilfred A. Cote', Jr. 1968. Principles of Wood Science and Technology I Solid Wood, Springer-Verlag New York, Inc. 592 pp.
Kollman, Franz F.P. and Edward W. Kuenzi and Alfred J. Stamm. 1975. Principle of Wood Science and Technology II Wood Based Materials, Springer-Verlag New York, Heidelberg, Berlin. 703 pp.
Rowell, Roger M. Editor. 1984. The Chemistry of Solid Wood, American Chemical Society, Washington, D.C. 614 pp.
Goldstein, Irving S., Editor. 1977. Wood Technology: Chemical Aspects, American Chemical Society Symposium Series 43, Washington, D.C. 372 pp.
Sjostrom, Eero. 1981. Wood Chemistry, Fundamentals and Applications, Academic Press. A subsidiary of Harcourt Brace Jovanovich, Publishers, New York. 223 pp.
Stamm, Alfred J. 1964. Wood and Cellulose Science. The Ronald Press Company, New York. 549 pp.
Looking for a reprint of this article?
From high-res PDFs to custom plaques, order your copy today!


