Outdoor Weathering Must Verify Accelerated Testing
Outdoor testing is essential for the validation of accelerated testing.
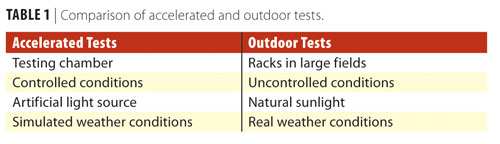
Currently, all weathering testing is done using either an outdoor exposure location or indoor accelerated testing equipment. These two major test types are not the same. Accelerated tests are made with controlled, artificial light sources in the laboratory, whereas natural weathering is performed in large outdoor fields with real sunlight but where all the exposure parameters are not controlled. Table 1 gives a comparison of outdoor and accelerated tests. The choices that are laid before us are whether to use the fast, controlled exposure that uses simulated conditions, or the slow, non-controlled test that is known for its realism. For many, the choice has been to pick speed over substance.

|
| Table 1 Click to enlarge |
When making the decision about which type of testing program to follow, there may be a number of “psychological” factors that unintentionally affect the outcome. In order to make a more informed and reliable choice about testing, we need to understand those biases, or what we might call Weathering Myths. Note: A myth is an unproven legend, a story that has been around for so long that it takes on a truth of its own.
Weathering Myths
Myth #1: Accelerated tests are 100% repeatable. The truth is that accelerated tests are as variable as any other test. In fact, accelerated weathering, even in the most controlled test, can produce a great deal of variability in the results. Repeat tests in the same device and reproducible tests in different laboratories may have high differences. A major round-robin was performed by ASTM Committee G03(1) in the 1990s and found that there could be as much as 30% difference in results from several devices. This difference is reduced with correct operation.
Myth #2: Any degradation is good. The truth is that the wrong degradation mode is a bad result. If the failure mode in the real world or outdoor test is not reproduced by the accelerated test, then the accelerated test should not be used. For example, if a coating normally exhibits moderate chalking outdoors but displays severe cracking in the accelerated test, this shows that a different failure mechanism is occurring and the results are therefore meaningless. The accelerated test chamber must create the same failure type as the outdoors.
Myth #3: Outdoor weathering requires five years to provide useful data. The truth is that outdoor testing can yield useful data in 12 months. While it may be necessary to wait five years to find out five years of degradation, there is much useful information that can be obtained in the first 12 months of exposure, such as the distinction between good and bad material. The truth is that with the correct experimental design and plentiful evaluations, meaningful data can be obtained that will greatly increase the confidence of the accelerated data.
Myth #4: Weathering test data is absolute. The truth is that no single test will yield perfect correlation. There are a number of material specifications that require a single test specimen to be exposed and where a pass/fail threshold is set. For example, if a color difference of 3.0 DE units is the criteria, then a value of 2.9 passes, but 3.1 fails. Yet we know the variability of the color measuring equipment is such that any comparison where the color difference is less than 1 DE unit is meaningless. The limit of human perception is also no better than 1.0 DE.
Myth #5: Ranked data is weak data. The truth is that ranked data can be powerful if correctly applied. There is a thought that non-parametric statistics, such as ranking, cannot be of any use because they are based on less powerful techniques. When properly applied, ranked data can be used to prove many of the hypotheses we test in weathering. Ranked data works well with numerical data produced in subjective evaluations.(2)
Unforeseen Problems
The problem we are facing as a testing industry is that many companies perform only accelerated weathering tests on their materials. The outdoor testing is either given second-class status, or is just simply ignored. The time-related pressure of moving a new material to market has forced a reduction in the development cycle, and this affects the durability testing. Most product development now is done with only the results from accelerated testing, and many material specifications will accept a material with only accelerated test results.
Using ONLY accelerated testing can have unforeseen problems. The main consequence is that the material is formulated for resistance to an artificial climate. As the cycle of testing, reformulation and retesting continues, the end result is a material that can withstand exposures to a simulated and controlled environment. This can lead to field failures when the material that has passed testing in the laboratory then fails in the end-use environment.
Accelerated tests are not 100% reliable in predicting what will happen outdoors. The search for a universal test method with perfect correlation is our industry’s equivalent of the quest for the Holy Grail. Correlation factors are not transferable from one material to any other or for the agreement to a different outdoor climate. If we could be sure of complete agreement in an accelerated test, the only need to conduct weathering outdoors again would be if we were comparing to a new climate. But even repeat tests where nothing has supposedly changed will give different results. Using only accelerated testing means taking a big risk when trying to determine the true reliability of the material.
Correlation
For the purposes of weathering testing, correlation is defined in ASTM G 113 as follows:(3) “The agreement of results between outdoor and accelerated tests.” Therefore, the results from the accelerated test are supposed to match the results from the outdoor test. Most research effort into this elusive target has focused on accelerated tests, but it is apparent that the key to correlation is the outdoor test. Without outdoor weathering as a baseline, there is nothing to provide a fixed comparison for the accelerated test.
Cost
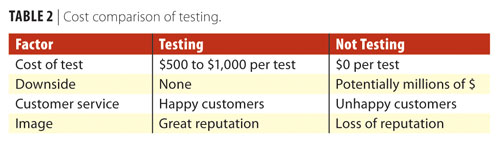
It is surprising that one of the major excuses for not doing the outdoor test is the cost factor. This should be the least of any worries, and while it may not be a technical issue, we do recognize that many important technical concerns are not being addressed because of the misconception that weathering testing is expensive. What should be considered is the cost of not testing.

|
| Table 2 Click to enlarge |
Table 2 compares the cost of a typical outdoor test to the cost of not doing a test. For the up-front saving of up to $1,000 per year you could be risking your company’s reputation as well as the potential for millions in warranty replacements, and potential litigation. The small investment in outdoor weathering tests should be compared to the potential cost of not testing.
Note: These figures are representative and do not reflect any particular charges. Testing costs may differ amongst different commercial providers of these services, as well as between commercial services and conducting the testing yourself.
Cyclic Conditions
One of the reasons we see many reports indicating poor correlation is because the factors of weathering are different in the weathering chamber than in the outdoor environment. The conditions within the chamber can cycle between any of the conditions in Table 3, but there are many factors missing.

|
| Table 3 Click to enlarge |
Table 3 shows that the three basic factors of weathering are included in most accelerated weathering test devices. The right-side column shows that there are many more factors that can influence outdoor weathering. Each new factor gives the possibility for many more related interactions.
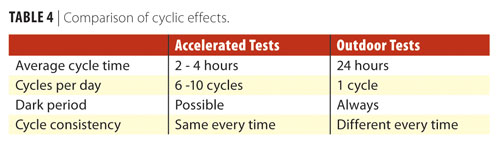
Cycle Times Compared
Even when we look at only those factors that occur in both the outdoor and the accelerated test, there is a difference in the cycle timing. For outdoor testing we are dealing with one complex cycle per day, whereas in the accelerated device, we are dealing with multiple, complex, repeating cycles per day. A summary of the differences in the cyclic conditions can be found in Table 4.

|
| Table 4 Click to enlarge |
Cycle Rate Comparison
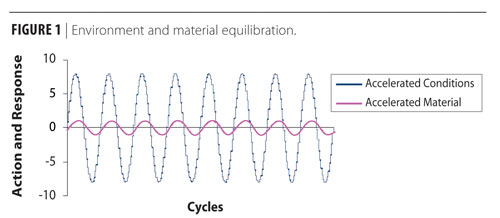
Compared to the outdoor environment where there is only one cycle per day, there may be as many as 12 complete cycles in the accelerated test. We have known for some time that cyclic exposures tend to be more severe than steady-state exposures. It is the changeover from one steady-state condition to another that puts the material under stress and causes degradation. Therefore, faster turnaround in the cycles should increase the degradation of the material because it is being subjected to more of the conditions that may cause degradation. In reality, this may or may not be true.
|
| Figure 1 Click to enlarge |
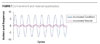
As conditions change, the exposed material will be attempting to equilibrate to its surroundings. For example, if the material is wet and the atmosphere is dry, the material will become drier, or if a cold material is placed in a warm environment it will begin to warm up. The environment contains the possibility of changing faster than the material. If the material does not equilibrate to the conditions before the conditions change, the materials will never reach a steady state (Figure 1). All materials have a different rate at which they can adapt to the changing conditions around them. So it is quite possible that in the same exposure, some materials will equilibrate and some will not. Some materials will not completely attain the steady state.
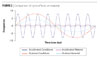
If the material under test does not attain steady-state equilibrium with the surrounding atmosphere, the effects will not penetrate into the depths of material. Short cycles will only have an effect on the surface layers. To reach the interior of a specimen, it is necessary to lengthen the cycle times in order for the whole of the material to be under the influences of the exposure conditions (Figure 2).
|
| Figure 2 Click to enlarge |
This difference can be summed up by the term “Chamber Factor”. This implies immediately that the changing conditions inside the weathering device cannot match the outdoors unless the cycle times and the ramping rates are identical to the outdoors. If the changing conditions do not match the outdoors, the effect on the material will be different.
We can draw the following inferences from this. First, it is clear that weathering chambers cannot match the complexity of the outdoors. There are more variables in the outdoors, and the cycle timings are significantly different. Second, as a consequence, enclosed chambers and open spaces may not yield the same results.
Accelerated Test Design
Once we comprehend the shortcomings of accelerated testing, we can plan our approach to creating an accelerated weathering test program. This is a bigger commitment than simply slipping some specimens into the first accelerated weathering device we find with some extra space. The following is the basic outline of a plan that can be followed to get the best possible test cycle.
- Accelerated test conditions and cycles should be developed using a plan of simulate first, then accelerate.
- Determine the extremes in the weathering factors, for example, highest and lowest temperatures, maximum irradiance, relative humidity ranges, etc.
- Determine the response rates of the material. What is the rate of change in moisture content when moving from a 50% to a 100% RH atmosphere (and in the reverse direction)?
- Determine the minimum cycle time based on the material reaching the steady-state condition.
- Consider an unbalanced cycle (such as the SAE J2527) in lieu of the same, old repetition (such as the 102/18 cycle).
- Once a test method is demonstrating some promise, the test can be repeated to prove repeatability.
- Ruggedness testing, by increasing one parameter at a time, can be used to determine the limits of acceleration.
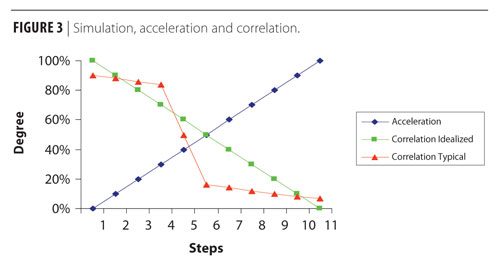
How Much Acceleration?
|
| Figure 3 Click to enlarge |
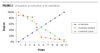
When you have zero acceleration in the simulated test, you can expect to get close to 100% agreement. As the degree of acceleration increases, the obvious reaction is that there will be a corresponding decrease in agreement. In an ideal test there will be a direct relationship between agreement and acceleration, but the typical situation is that there are thresholds. This is where the agreement remains pretty good for a certain amount of acceleration, but then drops off dramatically (Figure 3). This is due to one of the influencing factors exceeding a critical point.
Outdoor Weathering
How do you make sure that you get good data in a meaningful time frame? The design of the outdoor test must be done correctly before the test is started. Your outdoor weathering program also requires some advance planning. Test objectives must be determined before you begin your exposures. The following is a list of good practices to follow in order to maximize the success chances from the correlation.
- Begin testing as soon as possible.
- Use many replicates.
- Evaluate regularly and often.
- At least five evaluation intervals per test.
- Use control or reference specimens.
- Establish a baseline of material degradation.
- Typically 12 to 24 months sufficient.
Specimen Matrix
The typical experimental material variable array is unbalanced. This will cause problems, as large amounts of raw data need to be reduced into groups in order to see patterns develop. For many years we have heard that the right way to do an exterior exposure test is to expose as many specimens as possible, as quickly as possible. If not planned correctly though, the excessive amounts of data collected by the end of the test can make all the results appear random. Our desired evaluation of a new test method might look like the following example for an automotive paint.
Color: Red, Blue, Green, Yellow, Black, White, Gray (7)
Substrate: Steel, Aluminum, Plastic (3)
Binder: Binder A, Binder B (2)
Color Coat:Reflective, Matte, Glossy (3)
Topcoat: Polyester, Silicone (2)
Number of specimens is the multiple of all the variables and in this case is 7 x 3 x 2 x 3 x 2 = 252. The total of 252 is considered to be an average test for an outdoor exposure test, but for many studies this is too big of a sample set to expose in the accelerated test. We could then consider a partial sample set, which reduces the quantity of specimens. A smaller matrix extracted from the above plan might look like this. Colors 3, Substrates 2, Binder 1, Color Coat 1, Topcoat 2 for a total number of variables of 3 x 2 x 1 x 1 x 2 = 12. This set can be tested and if the results are promising, the rest of the matrix can then be evaluated.
Balanced Design
The specimen matrix must be balanced so that meaningful comparisons can be made. In order to get meaningful conclusions, individual results need to be grouped, and in order to do this properly, all specimen types must be represented in all the tests.
- Every variable must be in every test.
- Use an equal number of specimens in each test.
- Use the same number of exposure periods in each test.
- Use the same evaluation techniques throughout.
The schedule of evaluations does not have to be evenly distributed. It is acceptable to schedule more evaluations in the early periods of the test. This is likely to be the time when the greater amount of change is achieved. The use of replicates is most important. Too many tests are conducted with only a single specimen representing each variable. The end of the test, when it is time to analyze the data, is not the time to find out that not enough specimens were exposed.
- More specimens lead to better data analysis.
- At least three of each kind allows mean, median and standard deviation calculation.
- More specimens permit a conclusion with smaller difference between results.
Reference Materials
Reference materials, which are also known as control materials, are a valuable tool in comparing accelerated and outdoor tests. A reference, or control, material is one with known performance, and this can be used to verify that the accelerated test is yielding the correct failure types. Use the reference material to compare different tests or different exposures. The accelerated test is only useful if it produces the same type of degradation as the outdoor exposure. By basing the end point of any test on the amount of degradation on the control material, we can make judgments as to whether the other materials are better or worse.
The results from the reference materials can be used to “normalize” the results. If we know that we get a certain amount of degradation on the control material in a set time frame outdoors, we can use that to determine the amount of time in the accelerated device that is equal to the time outdoors. When the amount of time to reach this point changes from one test to another or from one exposure to another, we can always use the response of the reference material to reset the time scale.
Another “best practice” method is to always expose one good and one bad “control” material. When only one control material is included in the test, it should have a degradation end point somewhere in the middle of the pack. That is to say, the control material should not be the best performer nor should it be the worst performer. This is sometimes very difficult to predict, so a more reliable approach is to include two control materials. If you incorporate one relatively good and one relatively bad control material, it is easier to make sure their results fall somewhere in the group, and this also has the advantage of always knowing the “difference” between the two controls.
When we talk about control or reference materials for accelerated or outdoor weathering, this material is one of your own products. This material is not one of those standard reference materials such as blue wool, or a polystyrene chip. Your reference material should have been tested often, or there should be a large amount of data on its known performance in the end-use environment.
Repeat the Test
It is most important and often overlooked, but you must repeat the tests. This will prove the test method is correct by ensuring repeatability. We need the data from repeat tests to show the inherent variability in the testing. The difference in the performance of two materials must be more than the inherent variability of the test before it is possible to say with any certainty that there is a real difference. The second step in developing a standard test is to prove it can be done again. Lastly, it would be good practice to see if the test can be reproduced by another lab or by another technician.
Unknowns
Determine and measure the unknown factors that will appear when testing. It is a fact of weathering testing that we should expect the unexpected. Therefore when unexpected events happen, make notes and store the data. There may be a time when the odd data reveals a pattern. If something happens differently in one test versus another or between the outdoor and accelerated tests, this might mean there is a different failure mechanism.
Gather the Data
To correctly examine the testing, our recommendation is to ensure there are at least five evaluation intervals during the extent of the test. If the initial condition is one of these intervals, that means we need four other sets of results. In the opinion of this author, this is the minimum quantity of data sets needed to properly track the degradation. The following three rules should be followed.

|
| Table 5 Click to enlarge |
- Know your degradation mode. This will ensure that when the results are forthcoming, only the correct type of degradation will be acceptable.
- The degradation result must be the same in all tests. The test is invalid if you get different failure modes in the different tests. If cracking is found outdoors, and blistering occurs in the accelerated test, the wrong failure mode is being recreated.
- Evaluate for all known degradation modes. It is not good practice to only judge a test by one failure mode. In most cases there are typically multiple degradation symptoms. Testing for only one failure mode may prevent us from seeing if we have a problem as per rule number 2 above. Keep all original data, especially if testing for instrumental color difference.
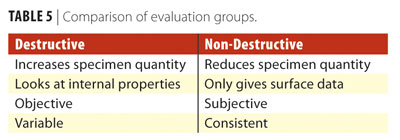
Choose a type of evaluation that most closely meets your needs. Table 5 compares advantages of the different evaluation types.
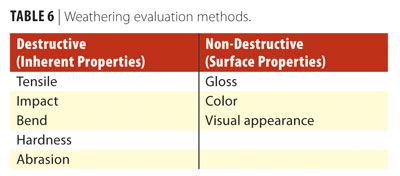
The measurement techniques described in Table 6 are a sample of the type of analyses that can be performed on weathered specimens. Non-destructive testing can be used to rate surface properties and have the advantage of requiring fewer specimens. Destructive testing will determine inherent properties of materials, but as the specimens are destroyed during the evaluation process, more specimens are needed initially.

|
| Table 6 Click to enlarge |
Acceleration Factor
Acceleration factors are the most widely requested information. We are often asked “How many hours in a weathering chamber equals one year in Florida?” or “How many years in Europe equals one year in Florida?” We cannot answer these questions, but we can provide instructions on how those numbers can be determined for a particular specimen in a specific test. The following list is a guide for how to determine your own acceleration factors. An example of how to calculate acceleration factors can be found in the section on time degradation curves.
Summary of steps to create Acceleration Factor:
- Use Time versus Degradation curves;
- Compare the accelerated and outdoor;
- Check for time to reach same amount of degradation;
- Verify by ranking or compare means;
- If results are the same, calculate acceleration factor (AF);
- AF = Time outdoor/Time in accelerated.
Data Analysis
In the general field of weathering, there are two good practices for examining data.

|
| Figure 4 Click to enlarge |
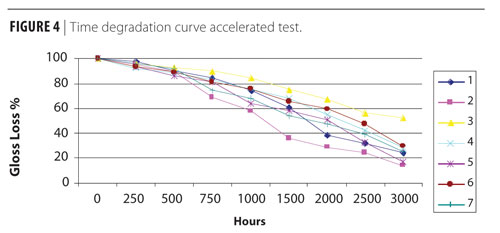
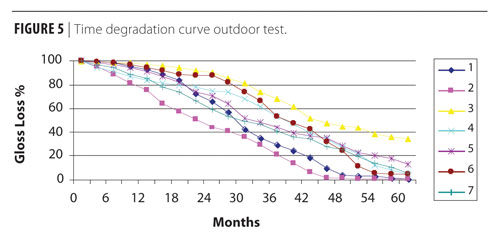
Time Degradation Curves
As described above, this technique requires nothing more than to track the degradation results over time. By plotting the points on a graph we can see the shape of the curve. Not all degradation is linear. In fact, most degradation curves show a stable period, followed at some point by a marked increase in degradation. By comparing the degradation curves of the same group of materials in both the accelerated and outdoor test we can determine such things as:
- Is the shape of the curve similar? This tells us whether the failure mechanism is the same.
-
Does the relative performance of the specimens change during the test? This tells us that we must be careful about when we perform the determination about the comparison of the tests.
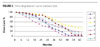
Figure 5 Click to enlarge
- Is the overall duration of the test correct? The most favorable point in the test for determining performance differences is where there is the greatest separation. The greater the difference between the specimens means we can more easily and confidently conclude relative performance rankings.
|
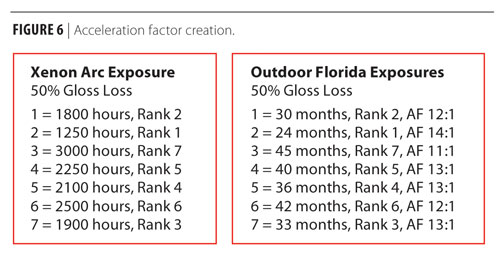
| Figure 6 Click to enlarge |
The time degradation graphs in Figures 4 and 5 can be used to generate the acceleration factor calculation in Figure 6. The data shown in Figures 4, 5 and 6 is only an example of how this type of calculation can be made.
One other indication that the test comparisons are good is that all the individual specimens have approximately the same acceleration factor. If the factors are different, this will show that the accelerated test is not a good simulation of outdoor exposure.
Statistical Analysis

|
| Eq. 1 Click to enlarge |
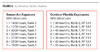
All testing results should be reviewed by some form of statistical analysis. The right statistics will tell you all the important things you need to know from a test.
- Is the test method realistic?
- Are the test results reliable?
-
What is the acceleration factor?
Eq. 2 Click to enlarge
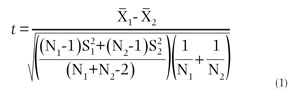
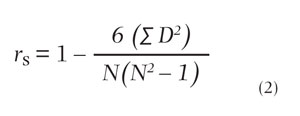
Although there are many statistical methods available, two simple, yet powerful statistics are recommended. These recommendations are based on many years of application to weathering data.(4) Comparison of Means (Student t) see Eq. 1, and Rank Correlation (Spearman’s rho) see Eq. 2, are recommended by ASTM Committee G03 and can be found in ASTM G 169.(5)
Best Practice Testing

|
| Table 7 Click to enlarge |
When it is time to start your weathering test, you have many options to choose from. The best practice is to run several outdoor and several accelerated tests and use the statistics above to determine which test method gives you the most realistic results. Table 7 is a list of the current technical possibilities for both outdoor and accelerated testing.
The different outdoor locations are used to ensure that all potential failure modes are examined. When you have found which test method is most suitable, you can conduct future testing with that procedure.
Note: You should re-verify the test exposure conditions if there are any changes to the formulation of the material. When the material changes, so does its response to the exposure conditions. Use a control specimen and re-expose along with the new material.
|
| Table 8 Click to enlarge |
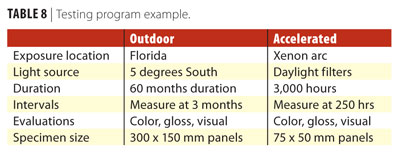
Table 8 shows one possible consolidated outdoor and accelerated test program. In this case the following assumptions have been made. The material is an automotive exterior paint that exhibits gloss loss and color change. The manufacturer wishes to have a five-year warranty on the performance of the material. Early examination of the material has shown that the failure modes can be recreated in a modified SAE J2527 test. There is a new directive to reduce the cost of producing the coating, and the testing laboratory is to determine if the newer and cheaper formulation has the same durability as the existing product.
Putting it all Together
Outdoor testing is essential for the validation of the accelerated testing. The outdoor testing can be done simultaneously with the accelerated exposures, and with the use of correct evaluations and statistical analysis will increase the confidence of conclusions taken from the accelerated tests. Laboratory-accelerated tests are one of the most useful tools available to researchers in developing new products, but in order to minimize the risk of wrong conclusions, realistic baseline data is required. Nobody wants to be surprised when specimens don’t perform as predicted by the accelerated test. Outdoor testing must verify the accelerated weathering.
This paper was presented at the 2010 Coatings Trends & Technologies Conference sponsored by PCI Magazine and the Chicago Society for Coatings Technology.
Looking for a reprint of this article?
From high-res PDFs to custom plaques, order your copy today!


