Dissecting Orange Peel – A Process-Oriented Approach, Part II
In late 2017, Saint Clair Systems, Inc., Carlisle Fluid Technologies and BYK Gardner formed a collaboration to definitively prove how film build, atomization and coating viscosity (as determined by temperature) interact in the formation of orange peel in highly critical painted surfaces as judged by wave-scan balance and distinctness of image (DOI).
In the first installment of this series, in the May 2018 issue of PCI, we reviewed the reasons behind doing this testing, the testing process and the creation of the panels from which the data was obtained. In this installment, with the DOE panel sets completed, we review the measurement of the orange peel on the panels, the analysis of that data, the conclusions that can be drawn, and the follow-up testing indicated by that analysis.
Measuring Orange Peel – A Brief History
For this test to produce any usable information regarding the creation and control of orange peel, we needed a good way to evaluate it – a method by which to measure it. Originally, orange peel was evaluated by comparing the finish with a visual standard. Figure 1 shows a visual comparison panel set made by ACT. For years, this was the most commonly used standard. This set of 10 panels allowed the finish to be graded in 10 steps, perhaps more by interpolating between two panels, and was as accurate as the operator using it and lighting allowed.
FIGURE 1 » ACT visual standard panel set.1
But as engineers, we needed a more reliable number – a more objective number – one that was not dependent on an operator, or lighting. Enter the BYK Wavescan II. Shown in Figure 2, this handheld device uses laser light to measure the physical variations in the surface finish. As shown in Figure 3, it then uses a series of mathematical filters to break these measurements down by size and report their frequency. The categories are as follows:
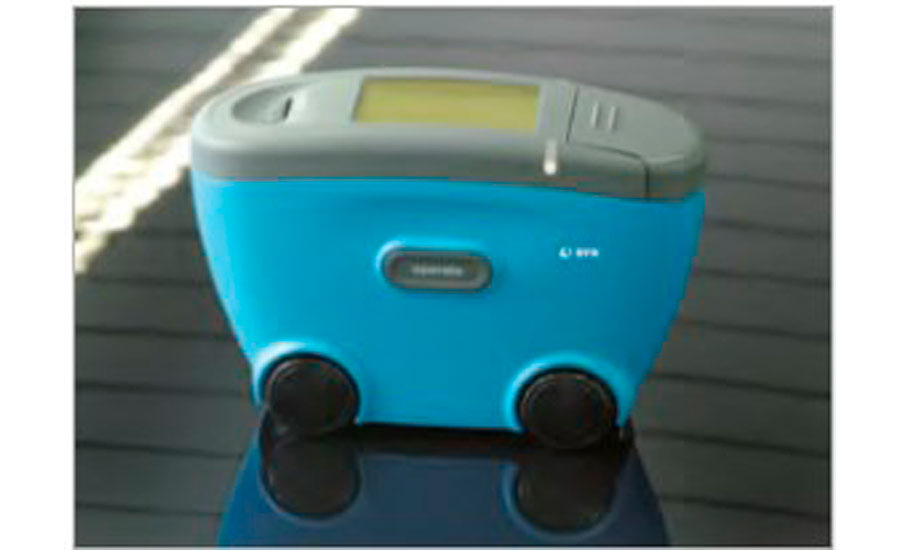
FIGURE 2 » BYK Wavescan II.2
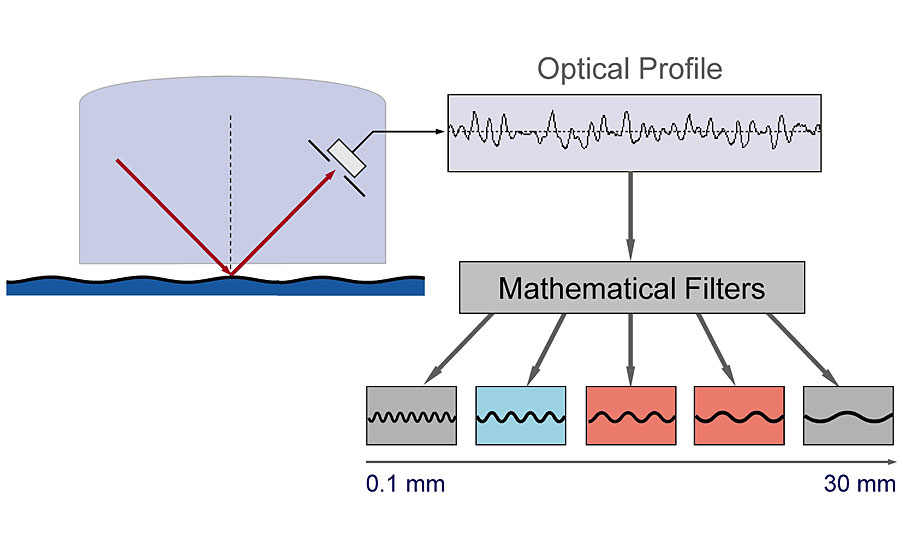
FIGURE 3 » Measurement method.2
- Du – This includes surface structures of less than 0.1mm in size and is considered a measure of “dullness”
- Wa – Surface structures of 0.1mm – 0.3 mm
- Wb – Surface structures of 0.3mm – 1.0 mm
- Wc – Surface structures of 1.0mm – 3.0 mm
- Wd – Surface structures of 3.0mm – 10.0 mm
- We – Surface structures of 10mm – 30 mm
These categories are traditionally grouped into shortwave (SW) and longwave (LW) ranges to describe their impact on orange peel, as shown in Figure 4. This simplifies referencing these measurements and understanding their influence on surface appearance.
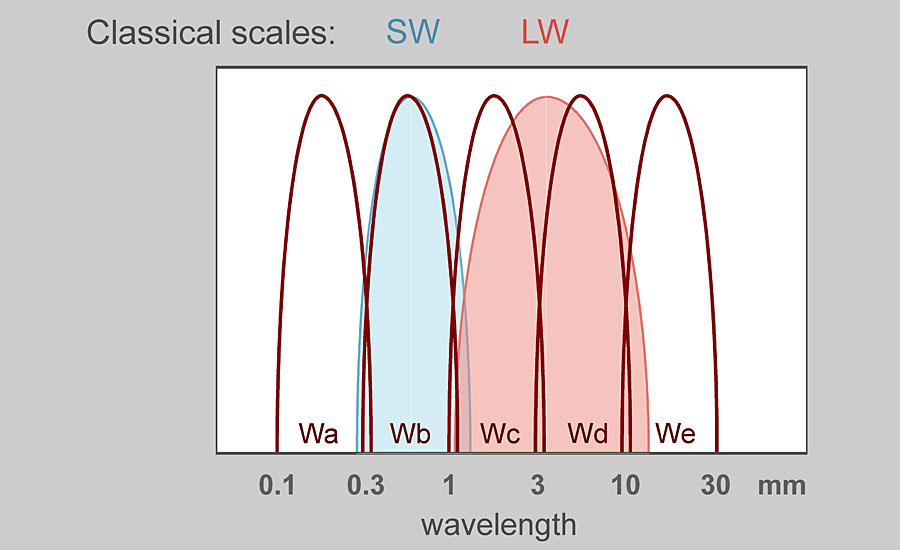 FIGURE 4 » Wavescan wavelength ranges.2
These measurements are both objective and comparable, making them perfect for analyzing the orange peel content of the sample panels created in this experiment. That this has become the defacto standard for orange peel measurement means that the results are directly applicable to real-world coaters and painters.
Analysis and Results
Each of the panels was measured with the Wavescan II and the measurements were entered into a database with the test conditions for each panel. Graphing this data in various ways facilitates analysis. First is the graphing of the wave-scan category data, as shown in Figure 5.
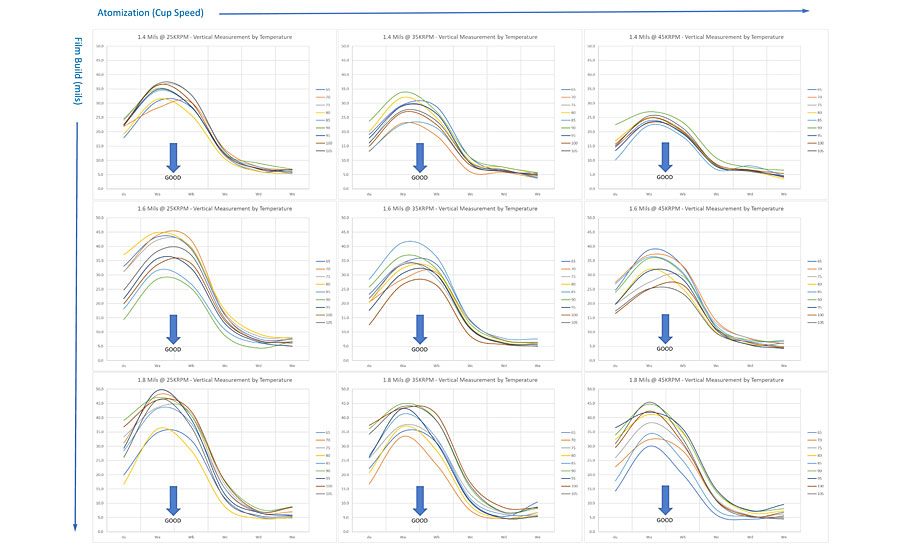
FIGURE 5 » Graphs of wave-scan category data.
In this view of the data, which shows all 81 panels, we can see some interesting trends. The first is the shape of these plots. For all film builds, and all atomization rates, and at all temperatures, the disturbances in the clearcoat are primarily in the shortwave range. This was due to the decision to use e-coated cold-rolled steel panels. The smoothness of these panels assures that only the components of the paint layer, in this case clearcoat, are prominent in the finish. This is a very important finding and we anticipate that this will factor greatly in future control strategies.
Continuing with this view of the data, as we increase in film build (moving from the top three graphs to the bottom three), we can see the magnitude of these shortwave disturbances increasing. This is due to increased movement in the coating layer during the cure process due to the higher volume of material to be cured. This can be caused by variations in temperature through the layer causing uneven cure from surface to substrate, or it may be due to solvents from the lower layers, nearest the substrate, disturbing the upper layers near the surface, as they exit the coating. As this occurs while these layers are hardening, the disturbances can be “locked” into the film, appearing as orange peel. This also explains why adding solvent to a coating to reduce its viscosity, will often result in increased orange peel.
Within this same pattern from top to bottom, we can also see that the variation in the shortwave magnitude increases as a function of temperature as the film increases. This is represented by the vertical distance between the curves on each graph. This variation is also reduced by increasing the cup speed to reduce average particle size. In the 1.4 mil graphs (top row), we see that increasing the cup speed from 25K RPM to 45K RPM reduces the shortwave component by more than 30%. This tends to support many coaters’ assertion that they need to run their bells at high speeds to get a good surface finish. However, these gains fall to less than 20% with the increased film builds. These observations also lend credence to the concept that these variations are due to movement within the clearcoat during the curing process occurring from the substrate up through the surface.
But it turns out there’s more to it than that…The problem with increasing cup speed to shrink particle size is that there is a point of diminishing returns. Too small of a droplet size is more readily caught in booth drafts and pulled away from the part, which can reduce transfer efficiency. In addition, small droplets can cause “dry spray” conditions as the solvents in the coating leave the droplet before it reaches the part. Insufficient solvent in the coating reduces its ability to flow out into the desired consistent contiguous film. In the extreme, the appearance can be more like sand on the surface than a film. This also negatively affects adhesion and corrosion protection for the part.
Numbers vs. Appearance
While the objective is to minimize all surface variations, a decrease in shortwave value results in a more brilliant appearance making longer waves more visible. Therefore, to optimize appearance, a “balance” between shortwave and longwave leveling is essential. That being said, trying to balance five ranges is considered too difficult to do on a production basis. Therefore, many companies have created complex calculations that attempt to distill this balance into one or two easy-to-use numbers. For instance, many automakers (Audi, Fiat, Mercedes, Renault and VW) use the traditional longwave and shortwave numbers, described above, to judge their appearance. Chrysler and GM have developed the R scale, and Ford the CF scale, whereas BMW uses two calculated numbers (N1 and N3), and the list goes on.
The problem is that these numbers may not accurately depict the visual. BYK uses the example shown in Figure 6 to demonstrate this scenario. Not only does this validate the difficulty of assigning a single value to the visual, which we can see by the fact that the two images have a calculated R value of 7.1 and 7.2, yet have very different appearances, it also demonstrates the importance of shortwave to the overall appearance. As with the R value, the longwave is virtually the same in both pictures (9.1 vs. 9.2). In the right frame (R=7.2) we can see that the elevated shortwave cancels out much of the longwave, but also dulls the surface, reducing the distinctness of the image. In the left frame (R=7.1) the shortwave is half that in the right frame. Here, the reflection is brighter and clearer, with greater distinctness of image, but the longwave is much more evident. This balance is easy to interpret from the graph of the du-We ranges for the two images in the far left frame.
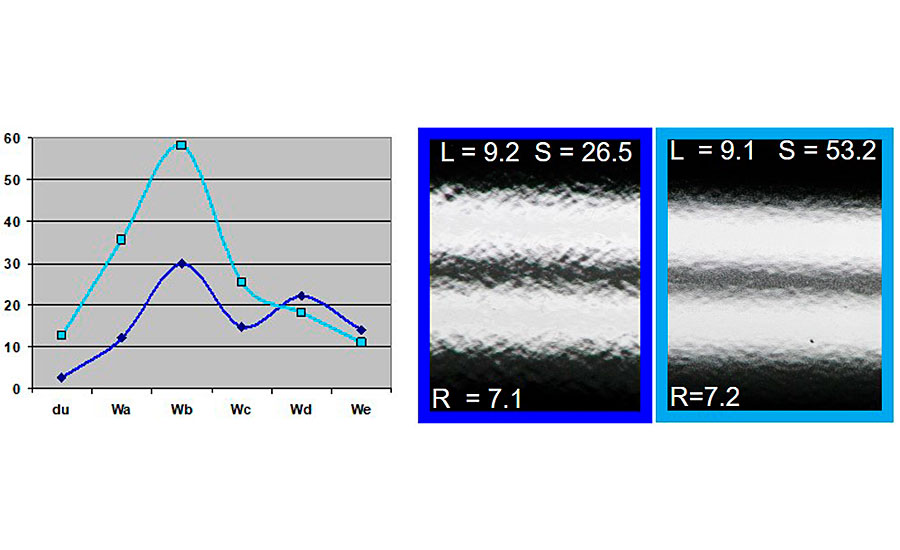
FIGURE 6 » BYK dxample of R scale orange peel measurement.
The test panels in the BYK example were shot under fluorescent lights to get the reflection. In order to produce a clear visual comparison with our test panels, we selected a common and well-understood vehicle – the eye test chart. As shown in Figure 7, we selected three panels from the 16 mil group coated with a cup speed of 25K RPM to represent the best panel (sprayed at 90 °F), a moderate panel (sprayed at 105 °F), and the worst panel (sprayed at 80 °F). We can see from the eye chart reflections that, as the shortwave decreases, the clarity of the reflected image improves. Because our choice of panels produced virtually no longwave component, this decrease in shortwave did not result in the anticipated increase in longwave appearance.
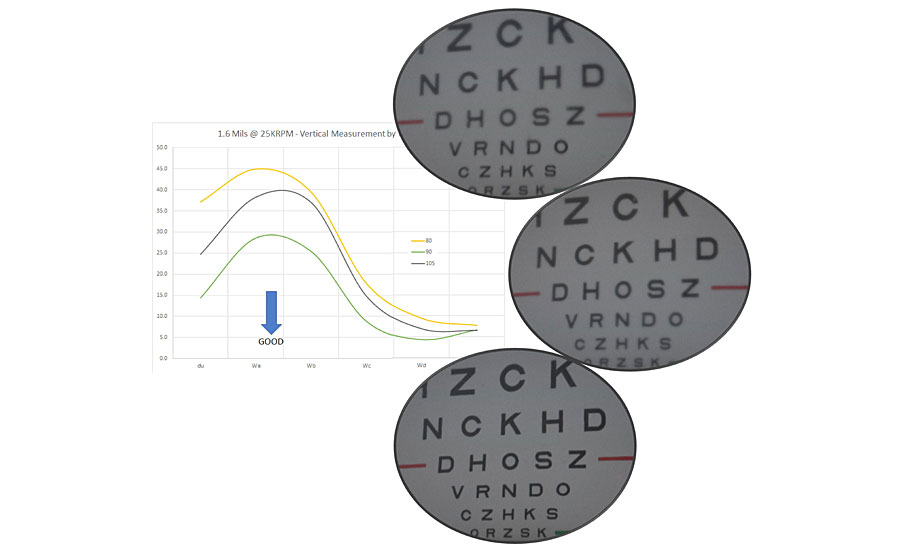
FIGURE 7 » Test panel comparison.
In addition to the du-We data, the BYK Wave-scan was programmed to calculate and export all of the various scales in use today. A majority of those scales are heavily weighted toward the longwave content in the image, and since the panels for this test had virtually no longwave component, those scales did not produce very good results.
The scale that we found to best represent the visual images under these conditions was the N1-N3 combination used by BMW. Figure 8 shows the N1-N3 graph for the 1.6 mil panels sprayed at 25KRPM shown in Figure 7. We can see that the graph closely matches the reflected images and range plots with the image at 90 °F holding the best appearance of the three, and the image at 80 °F showing the worst appearance.
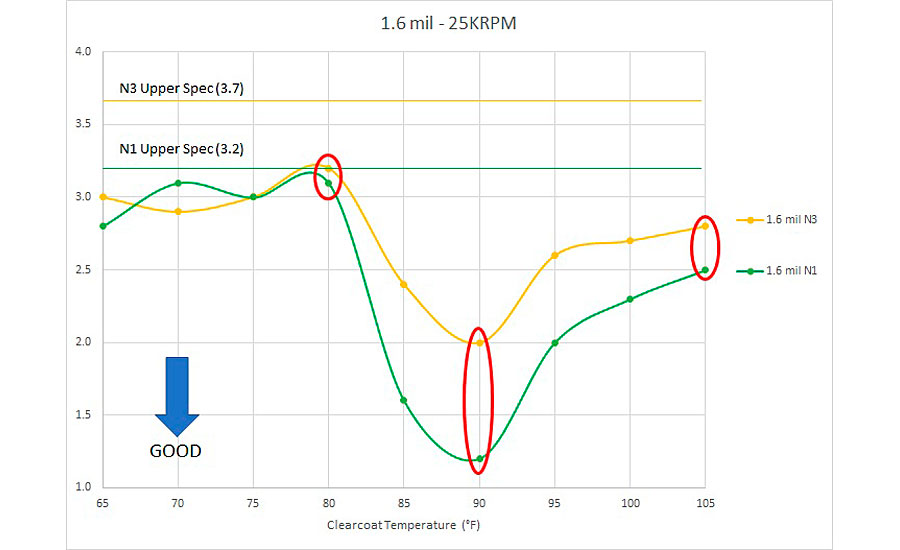
FIGURE 8 » N1-N3 graph for Figure 7 panels.
Looking Beyond Appearance to Cost
Appearance is important and cannot be understated. But improvement projects get approved based on their financial return. Strangely enough, we found that under these test conditions, the N1-N3 plots also made it easy to compare scenarios for their impact on operating costs.
Take, for instance, the situation where the low end of the clearcoat film specification is 1.4 mils to provide the best balance between appearance, durability and longevity. The most economical production process would coat at 1.4 mil film and no more. However, incoming production parts are inspected and rejected primarily for appearance issues, therefore it is commonplace to coat at a higher film, say 1.8 mil, such that the part can be “finessed” (polished) after the coating process, without danger of reducing the film below the minimum specification. This assures that the part meets both appearance and film build criteria when inspected.
This creates two issues for the part manufacturer. First, there is the excess cost of coating to add this extra film. This may go beyond just purchasing the additional clearcoat. It may also require changes in the curing cycle, which can limit line speed both through the flash tunnels and through the ovens, which are often the pacing process. This can limit total capacity for the paint line. Then, there is the cost of the “finesse” operation, which requires:
- Tooling (like racks and buffers);
- Expendables (like buffing wheels, polishing cloths, buffing compounds, gloves, etc.);
- Utilities (like electricity and compressed air);
- Real estate (to stage and work on these parts) ;
- Staff (to inspect the parts and perform the polishing operations);
- Extra handling (which invariably leads to collateral damage and scrap).
The good news from this study for manufacturers from both a cost and processing perspective is that, for a process with all variables controlled, the finish is better, and more repeatable, at lower film builds.
Returning to our example, if the part manufacturer has the capability to accurately control component ratio and flow rate (to control film build), cup speed (to control atomization) and coating temperature as it is being applied, he can fine-tune his finish at the 1.8 mil film level according to the N1-N3 graph shown in Figure 9.
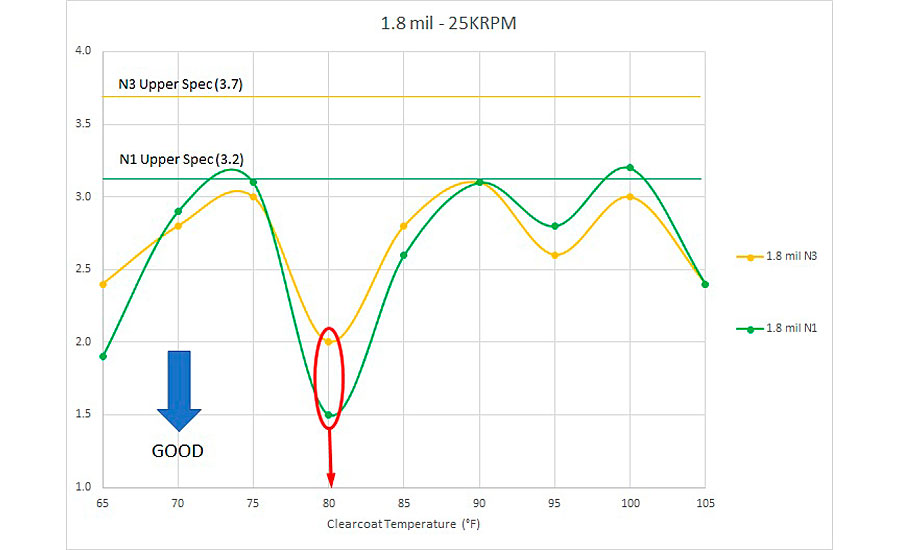
FIGURE 9 » N1-N3 graph for 1.8 mil panels.
This shows that overall finish quality can be optimized operating at a constant 80 °F coating temperature. While this type of control cannot address all conditions, like dirt, for instance, it will consistently produce parts that will require minimal or no finesse due to orange peel. And reducing finesse reduces cost – and that is good.
However, if we compare this to the N1-N3 graph for 1.6 mil film in Figure 8, as we have done in Figure 10, an interesting opportunity appears. By shifting the coating temperature at the point of application up to 90 °F and reducing the film to 1.6 mils (still well above the 1.4 mil minimum set forth for this example), the finish quality actually improves. While N3 remains comparable at 2.0, N1 is reduced from 1.5 to 1.2. This is in keeping with the observations we made from Figure 5 regarding improving finish as film decreases, but also clearly describes the process conditions under which this improvement will occur.
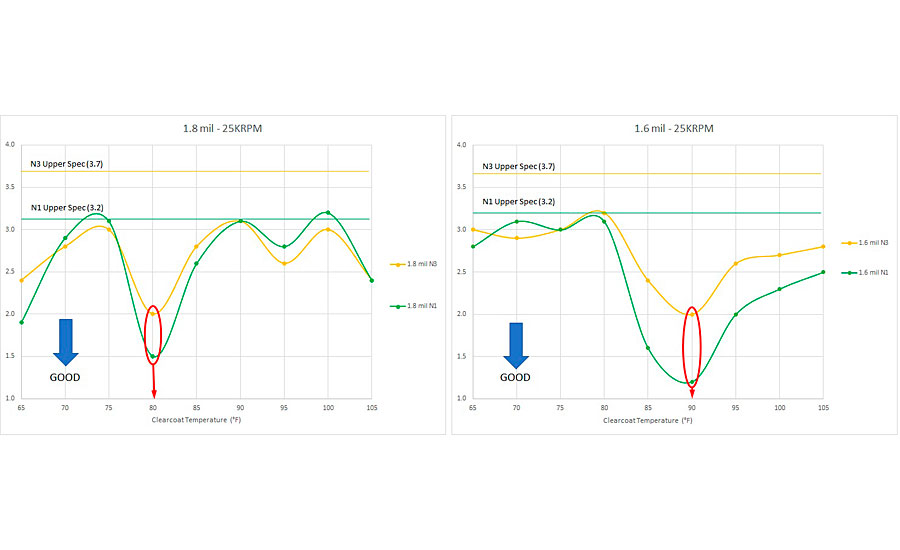
FIGURE 10 » N1-N3 comparison of 1.8 mil and 1.6 mil panels.
In this example, this re-balancing of process parameters results in a reduction of clearcoat usage by more than 11%, while reducing or even eliminating finesse to correct orange peel defects – all while maintaining a comfortable margin on the film build requirement. Following this same logic, it would be possible to push the film down to 1.5mils, pushing the savings to nearly 17%, with the potential to further improve finish quality. All of this holds the potential to reduce curing requirements and increase throughput, thereby increasing production capacity.
If controlling coating temperature at the point of application to improve overall finish quality is good, then using this as a tool to promote rebalancing of all these parameters to reduce coating consumption and curing costs while simultaneously improving finish quality, reducing rework and scrap, and increasing throughput and capacity, is better.
Conclusions
From this first design-of-experiments we have learned many interesting and valuable things about the impact and interaction of film, atomization and temperature on finish quality. First, the orange peel components most prevalent in the clearcoat layer are shortwave. This suggests that the longwave components are contained within the substrate, primer and basecoat layers. If this can be proven correct in subsequent testing, it suggests that we may be able to focus our attention on specific wave-scan ranges in each paint layer to more accurately control, and ultimately eliminate orange peel.
Next, within the clearcoat, the shortwave component is reduced as film build is reduced. This is likely due to reduced movement in the coating layer during the cure process due to the lower volume of material to be cured.
Likewise, the shortwave component is reduced as particle size is reduced through greater atomization. This has limits though, as particles that are too small produce conditions prone to reduced transfer efficiency and dry spray defects.
It is also evident that the orange peel components are heavily affected by the temperature of the coating at the point-of-application. This is due to the changes in viscosity, and in the case of 2K coatings, also the reaction rate between the resin and catalyst, which is also temperature dependent.
From these facts it is easy to conclude that carefully balancing the clearcoat process around film build, atomization and coating temperature at the point-of-application can significantly reduce orange peel in the clearcoat layer and facilitate lower film builds and reduced rework requirements. In addition to significant appearance implications, there are significant cost and capacity ramifications to controlling these three variables in the painting process.
The Next Steps
It has long been understood that good science leads to more questions, and this effort has produced many that warrant further investigation.
- Testing on vertical surfaces
- Testing with basecoats
- Testing on multiple substrates
- Testing to confirm the theory that the longwave components of orange peel are contained within the substrate, primer, and base coat layers
- Testing the combination and interaction of the basecoat and clearcoat layers to determine if there are any better ways to break down and control orange peel on a production basis
We are excited by these prospects and look forward to further future investigations.
References
1 Photo courtesy of ACT Test Panels, LLC.
2 Courtesy of BYK Gardner.
Looking for a reprint of this article?
From high-res PDFs to custom plaques, order your copy today!


